With the advent of GPS systems, navigating with a map have almost become a lost skill.
If you were to use a map, or if you had to travel overland, how would you measure the distance you’ve covered?
In this post, we’ll teach you pace counting with Ranger Beads.

Pace Counting with Ranger Beads
Being able to navigate yourself to safety has become an often overlooked skill.
Fortunately many hikers, outdoors men and women, and preppers still use compasses and maps to find their way, but they still need a method to measure the distance traveled from the last way point, so they know how far until the next. This is where Ranger Beads come in handy.
What are Ranger Beads?
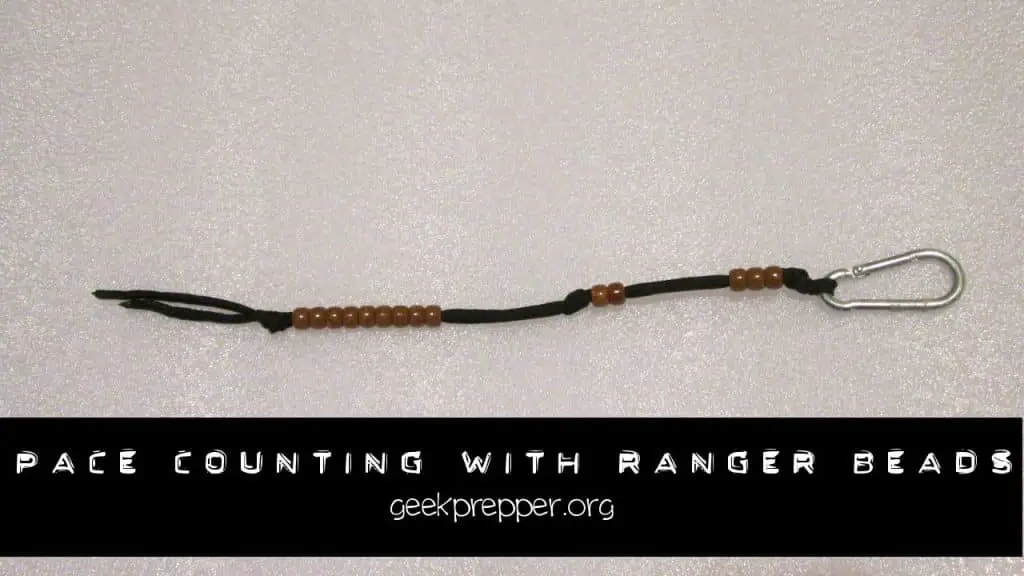
Ranger beads, also referred to as pace counting beads, refer to manual counting tools mainly used in monitoring a traveled distance using a pace count. You can see it being used in orienteering or military land navigation. Army Rangers are considered experts at land navigation, which is why these pace counting beads are often referred to as Ranger Beads.

In most cases, this tool for pace counting consists of thirteen beads integrated into a cord. The beads also come in two sections, almost evenly divided and separated using a knot. Usually, you can use nine beads at the lower section while the upper section comes with at least four beads.
You can also see a loop at the upper end. This is useful in attaching the tool to your gear/s with the help of a simply designed larks head hitch.
Developed originally by the military, these ranger beads also serve as effective tools for measuring the distance that you travel by foot. You can move the beads at certain distances as a means of counting your total walking distance.
Where Can You Get Ranger Beads?
You can purchase pre-made Ranger Beads, in many cool styles. They come in all colors and with various interesting beads (even skull beads….spooky). I made my own Ranger Beads with a piece of paracord and …. you guessed it, some beads.
Supplies Needed:
- 30-ish inches of paracord
- 6x9mm beads (I borrowed 14 Pony Beads from my daughters. Luckily they had some brown ones in their stash).
- Paperclip
Instructions:
1. Remove the inner strands from the paracord – Note that you only need to use the outer sheath. Keep those inner strands for something else (Honestly I don’t know what you’ll do with them, as my strands are still hanging off the door knob on my office’s closet door).
2. Fold the paracord in half.
3. Bend the paperclip into a narrow hook on one end – You can leave the remainder of the paperclip as-is. This will prevent the beads from escaping from you while you are feeding them onto the paracord. Needle nose pliers might come in handy in case you need something to hold the paperclip behind the bead you are currently forcing onto the doubled-up paracord.
4. Feed the beads into the paracord – Eventually you will manage to feed all your beads onto the paracord (unless you forgot to remove the inner strands from the paracord).
5. Separate 9 beads to the bottom portion of the paracord and 5 beads to the top. 3 well placed Overhand Loop knots (and a small carabiner) later, and you have a working set of Ranger Beads that will measure 5 km.
You want to leave enough room between the knots and beads that they can have some room, so you can slide them up and down, I like about 2 inches of paracord separating my beads and knots.

How Do You Use Ranger Beads?
Using the beads to determine how much ground you have covered is easy but only if you can count to 10. Basically, there are a couple of methods for using ranger beads. The first one involves taking into consideration the number of paces you have walked. The other method represents the specific distance you have walked.
These two methods of using ranger beads require you to familiarize yourself with how your traveled distance and walked paces are connected.
1st Method – Pace Counting
This method involves sliding one bead each time you take ten paces on the cord. Once you get to your tenth pace, you will need to slide one bead found at the lower section to the knot. You will know that you already reached the 90th pace when all nine beads in this tool are already against the knots.
Once you reach your 100th pace, you should take the nine beads away from the knot. When this happens, one bead positioned at the upper section will also slide upwards, moving away from the knot.
This method helps in calculating your traveled distance through the specific number of paces you took. For you to use the pace counting method effectively, it is important to learn your pace’s length so you can correctly measure your traveled distance.
2nd Method – Distance Walked
In this method, you need to pull down one bead at the lower section for every walking distance of 100 meters. This means that you have already walked a distance of 900 meters once you were able to pull the 9th lower bead.
Upon reaching 1,000 meters, one upper bead will be pulled down while the lower beads should be pulled up once again.
This method requires you to determine the specific number of paces you have walked in a 100-meter distance. You can also use this technique for non-metric walking distances, although you will need to arrange the beads differently.
Specific Instructions:
For you to use the ranger beads more efficiently, here are more detailed and instructions:
1. Calibrate the beads – To “calibrate” your beads, you need to a flat surface about 100 meters long (Soccer fields are 100 – 110 meters, find one that is 100m). If you can’t find a 100m Soccer field, then measure out and mark a 100m distance.
2. Walk 100m – Do this while also counting how many steps/strides it takes you to get from one end to the other – For example, if it took you 50 steps to cover 100m, then every 50 steps you take, you are going to pull one of the lower 9 beads down to represent 100 meters.

3. Take another 50 steps – Take another 50 steps (100m) and slide down the 2nd bead to show that you have traveled 200m and so on. This continues until you have slid all 9 of the lower beads down (900m).
4. Travel another 100m – Slide all 9 lower beads back to the upper knot when you do that, then slide one of your upper 5 beads down. This is an indication that you have now traveled 1km.
5. Continue to do this throughout your hike to know how far you have walked away from your starting point. Remember that this setup only has 5 beads on top, so you can only measure 5.9km (5km, 900m).


Keep your Ranger Beads attached to your pack at all times to see how far you’ve traveled by pace counting. It’s a handy skill on low/no signal areas or when you have no battery juice left on your phone.


Another great article. Thanks.
However, I don’t want to bump into the guy who’s got the 2 meter stride… ;-P
Good evening, I’m an Italian student from Venice (IUAV architecture and design). I’m writing you because I have to do a deep study about the ‘ranger beads’ or pace counter beads. It has to be an historical study by considering how, when, why, but most of all who invented it. I’m looking for all of these information, I’ve also find some books, actually just one. At the moment the information I’ve found aren’t enough to sustain my research exam. So I wondered if you could help m.,
kind regards
-Valerio Romano
Fairly good article Your last bead picture “2.9km (or 2km, 900m), another 100m and you’ve gone km!” You might want to update the final distance to 3.0 Km. Just a typo, or Scotty just had fun with you with the transporter.
Where this gets tricky is when you are in hills or mountains were terrain can cause your stride to change length. Also, realize that this method is great for straight distances, but at best it tells you how far your path is not a point to point to point distance. A straight line may not be the best way to go.
I’m so happy to have stumbled on this by linking from your Survival Supply Cache article. What other simple devices like this would you recommend? I’m writing a novel set in a post-apocalyptic world far enough in the future where most technology has broken down (give or take 100 years), but they have passed down memories of modern devices (i.e. any invention/tool post-medieval but handmade would not be out of place), and some resources can be traded across long distances (i.e. mined minerals). My party is exploring in an unfamiliar, hostile town with only very old or hand-drawn maps. Certain characters are well-trained in scouting and survival. What other simple or clever devices like this do you think would be in their kit?
Great article, I will be making some for sure, thanks
Wow don’t know I missed this